Author: neil

  • Making an Easee One charger work with Intelligent Octopus

    Making an Easee One charger work with Intelligent Octopus

    Disclaimer: This is an academic exercise. While this method works, it’s using an unsupported charger and Octopus may not like that. I’m not responsible for you following this guide and getting charged peak rate for charging, being kicked off the tariff completely, or Greg Jackson kicking your door in. You have been warned.

    The Easee One charger is a really well designed and manufactured piece of kit, but despite Easee having a concept of an “operator”, and supporting OCPP for as long as I’ve owned one, it seems Easee can’t fill out a simple form. As a result, they remain one of the few chargers that aren’t supported by the Octopus Intelligent Go tariff.

    The Intelligent Go tariff is one of the best tariffs for UK EV drivers, offering very low overnight rates ( 7p at the time of writing ) for 6 hours, and for the entire house not just the EV. Also at the time of writing, if you need more time to charge your EV, then Octopus gives a lower rate for the entire time your car needs to charge, with the whole house accessing that low rate too. This means that you can potentially charge your EV from empty to full in an single night at a very low cost. Note Octopus are threatening to change this, but currently this is still a compelling reason to be on Intelligent Octopus.

    Octopus can do this because at the point you sign up, they enrol your MPAN into a flex arrangement, curtailing the charging of your car when the grid is stressed, but also charging your car outside of the low rate period when energy is abundant. They use the flex credits they get from this to blend a cheaper low rate for the whole house. The snag is that they need to be able to control your EV’s charging, either by controlling your vehicle ( preferred by Octopus ) or by controlling your charger ( next best option for Octopus ).

    While many EV chargepoints are supported, Easee isn’t. This means that if your vehicle also isn’t supported then you can’t use the Intelligent Octopus tariff. However… Easee have recently enabled “local OCPP”, meaning you can provision your Easee charger to communicate with a provider using the standards-based OCPP protocol, and Octopus does support OCPP with specific charger models.

    But there’s a catch…

    In order to do this, we need to use the Easee Developer API, and there’s a handy GUI onto it. We can use this API to provision OCPP onto the Easee charger.

    All we then need to do is find a suitable charger to masquerade as, and the Wallbox charger seems to be the only fit, given it uses OCPP to communicate with Octopus and doesn’t require any other credentials such as Oauth to set it up. All we need to do is enrol into Octopus Intelligent Go using a Wallbox, noting down the info and provisioning that into the Easee.

    The problem is two fold:

    1. When we get credentials from Octopus, they provide a UUID-like Chargepoint ID such as 00000000-000A-A000-ABCD-000000012345. Easee seems to have followed the OCPP standard to the letter and enforced a 25 character limit on the Chargepoint ID. The result is that if we provision an Octopus Chargepoint ID into the Easee API then it rejects the request with a 400 response.
    2. Easee allow OCPP endpoints using either unsecure as ws:// URLs, or securely using wss:// URLs. However they only accept secure endpoints IF you also provision with the certificate in the request, and they test the certificate when they establish the connection, all very acceptible. However, they also check the CN of the certificate with the URL we are connecting to. Octopus require the connection to be made to “ocpp.octopus.energy” however the CN of the certificate is a different Kraken endpoint, with “ocpp.octopus.energy” provided in a SAN record of the certificate, meaning Easee rejects the connection attempt.

    This all sounds bad, and it is if we try to connect directly, so game over? Not so fast…

    What we can do is to connect via a reverse proxy! We can do this because the Chargepoint ID is not actually used in the majority of OCPP messages, it’s only used during login and as part of the connection URL. So if we use a reverse proxy to sit in the middle of the connection between the Easee charger and Octopus’s OCPP server, the proxy is just transforming the URL. What we do need to do however is to set up a proxy to convert one URL into another while supporting WebSocket connection upgrading and handling the authentication with Octopus.

    While the younger crowd would probably use Nginx to do this, I used Apache given it’s what I had lying around and also what I know. What we’ll do is set up an Apache virtual host to act as a proxy, it will then accept a connection unsecured from the Easee and then proxy the connection to the OCPP server at Octopus. This also has a positive bonus of allowing us to inspect the traffic going back and forth using Wireshark.

    Piecing it all together

    Before we start, Local OCPP disables schedules on the Easee and that option will be greyed out in the app, but if you have any existing schedules then they will still appear in the app and you can’t amend them. To stop things looking strange, remove any existing schedules on the charger before enabling Local OCPP.

    Firstly, let’s sign up to Octopus Intelligent Go. We head to the website and input our car and say we have a Wallbox:

    It’s going to then redirect us to the app, which will in turn give us some Wallbox credentials, I’m going to the these as an example:

    • Octopus Chargepoint ID: 00000000-000A-A000-ABCD-000000012345
    • Octopus Password: xxxyyyzzz
    • Easee charger serial UK123456

    Let’s move over to Apache. I’m assuming we already have a working Apache setup on the local LAN to the Easee, and this Apache setup has the mod_proxy and SSL modules enabled.

    The next thing we need to do is to get a basic authentication header using the Chargepoint ID and password provided by Octopus. To do this, we take the Chargepoint ID followed by a colon followed by the password, e.g:

    00000000-000A-A000-ABCD-000000012345:xxxyyyzzz

    Then we just base64 it, If you’re lazy there’s tons of “Basic Auth Header” creators on the Internet. What we end up with is:

    MDAwMDAwMDAtMDAwQS1BMDAwLUFCQ0QtMDAwMDAwMDEyMzQ1Onh4eHl5eXp6eg==

    We can then create a virtual host in apache and restart / reload it:

    <VirtualHost 192.168.0.10:80>
        SSLProxyEngine on
        ProxyPass /UK123456 https://ocpp.octopus.energy/00000000-000A-A000-ABCD-000000012345 upgrade=websocket timeout=3600
        ProxyPassReverse /UK123456 https://ocpp.octopus.energy/00000000-000A-A000-ABCD-000000012345
        RequestHeader set Authorization "Basic MDAwMDAwMDAtMDAwQS1BMDAwLUFCQ0QtMDAwMDAwMDEyMzQ1Onh4eHl5eXp6eg=="
    </VirtualHost>

    Note the pertinent bits of this are the translation between the Octopus OCPP endpoint using their DNS name and the Chargepoint ID they provided, and the Easee Serial number used in the conneciton from the Easee charger. The other thing we added here is the Authorization header Octopus are expecting using the Chargepoint ID and password they provided. This is all that’s needed to build the conduit between the Easee charger’s OCPP connection and Octopus’s OCPP servers. The other attribute we’re passing enables upgrading of the HTTP connection to a full blown websocket connection. I’ve added a long term connection timeout of 1 hour also, but don’t think this is actually necessary.

    From what I understand, the only OCPP method which might contain the Chargepoint ID is a “reboot” message which isn’t used by Octopus for authorisation or billing. This is potentially the only thing that could give the game away but I doubt Octopus do anything with this message.

    Next, we just need to provision the Easee. Using the Easee Developer website we can use the “Saves OCPP connection details for given charger” method. Be sure to specify a “websocketConnectionArgs” object using an insecure “ws://” url and with our server name BUT DO NOT add the Easee chargepoint suffix from the URL, Easee does this for us. We also need to select “DualProtocol” as the connectivity mode:

    Or in curl-land:

    curl --request POST \
         --url https://api.easee.com/local-ocpp/v1/connection-details/UK123456 \
         --header 'accept: application/json' \
         --header 'content-type: application/json' \
         --data '
    {
      "websocketConnectionArgs": {
        "url": "ws://192.168.0.10:80"
      },
      "connectivityMode": "DualProtocol"
    }
    '

    If you’re logged in to the Easee developer portal we can send the command from right there, and you “should” get a 200 response back with a template ID. What I have found is that you need to then use the “Applies given OCPP configuration version to specified charger” method along with your serial number and the template ID from the previous step to actually apply that to the charger:

    After that, we should be able to plug our car in and go through the test charge. Now when we plug in, instead of the car charging right away we get something like this stating we’re “waiting for approval”:

    Then, once Octopus wants to charge our car, we get the usual screen:

    After a slot finishes we go right back to the “waiting for approval” screen. With IOG we get lots of slots, sometimes with gaps inbetween, in which case the Easee charger will start-stop-start-stop as required:

    Conclusion

    From my experience, everything works as well or as badly as the standard Wallbox integration, in fact the Easee works a little better as the WiFi implementation on Wallbox is flaky, losing the OCPP connection regularly whereas Easee if rock solid. I actually have a Wallbox which I have swapped between the Easee and Wallbox using the same credentials. Of late, Octopus seems to be far more random with charging slots, regularly changing the schedule and sometimes charging my car at the last minute halfway through a half hour period. I initially thought this was something to do with the Easee OCPP integration resetting the connection, but both looking at the OCPP going back and forth and moving back to the Wallbox, this seems to be normal behaviour.

    What I’ve also experienced both with the Wallbox and with Easee is that Octopus seems to keep planning slots to give me my “amount to add” setting, ignoring what they have already charged during the session! For example if I select “30%” as the amount to add, then Octopus will plan aroud 4 hours of charging, but after I have received 4 hours of charging ahead of my low rate period, it will STILL give me another 4 hours of slots! In conclusion I think something is strange at Octopus and not with the Easee / Wallbox OCPP connection.

    The other annoyance is that while the Easee is waiting for a charging slot to begin, the LED on the unit flashes. This can be quite distracting if your Easee unit is visible from the road or house. My feeling is that Easee expect the charging authorisation to be fairly quick whereas with IOG it can be as much as 12 hours between plugging in and the charge actually strating.

    I’m not sure whether I will continue to use Easee or my Wallbox, both work identically but obviously Wallbox is the supported charger. I have two Easee units and an Equaliser though, so the Easee is better for me load balancing between two EVs and my 100a incoming fuse. Decisions decisions…

  • Dashboard Web View – an Android app for fullscreen dashboards

    Home Assistant has an awesome Android app, but at the time of writing this post, it’s not possible to remove certain screen elements like the title bar. While Kiosk Mode does a great job at allowing customisation of elements on a user by user level, it’s largely ignored by the native Home Assistant app.

    With the native Home Assistant app you’re stuck with certain UI elements

    This means that if you want a fullscreen UI experience on an Android tablet, say in the kitchen, you either have to put up with title banners or pay for the Fully Kiosk Browser addon.

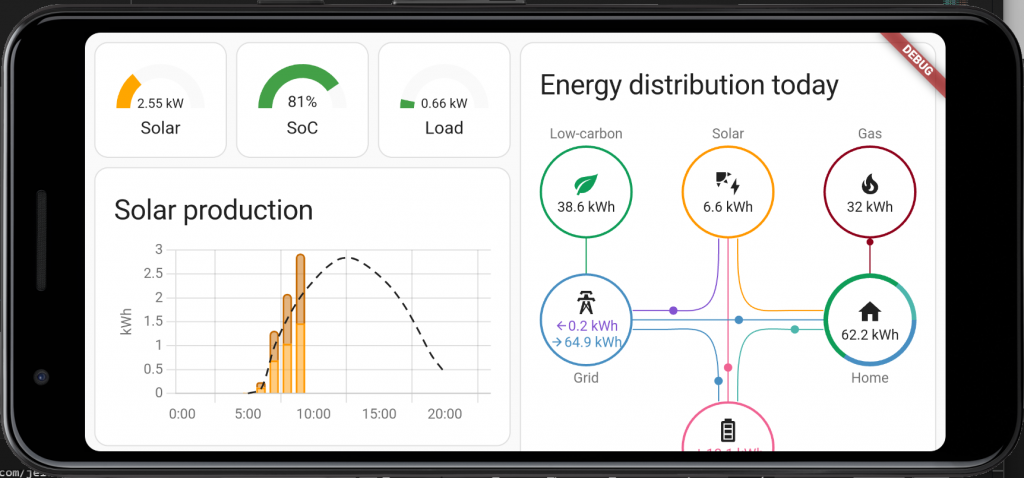
    To overcome this, I wrote an Android app in Flutter that lets you configure one or more pages and have these show different content, or automatically refresh. Refreshing is useful as some of the dashboard elements like the Solar Production chart don’t automatically roll over to the next day without a refresh.

    The APK can be downloaded from here: https://www.peely.com/wp-content/uploads/2024/04/DashboardWebView.zip . Once downloaded and unzipped, you can sideload it onto any Android device.

    The app renders pages as a regular browser would, and in its User Agent claims to be a regular Chrome browser so is fully compatible with Kiosk Mode>

    Dashboard Web View

    On startup the configuration screen is presented automatically, and at each startup you can get back to the configuration by pressing on the icon at the top left before it disappears:

    Press the icon on the top left to access configuration

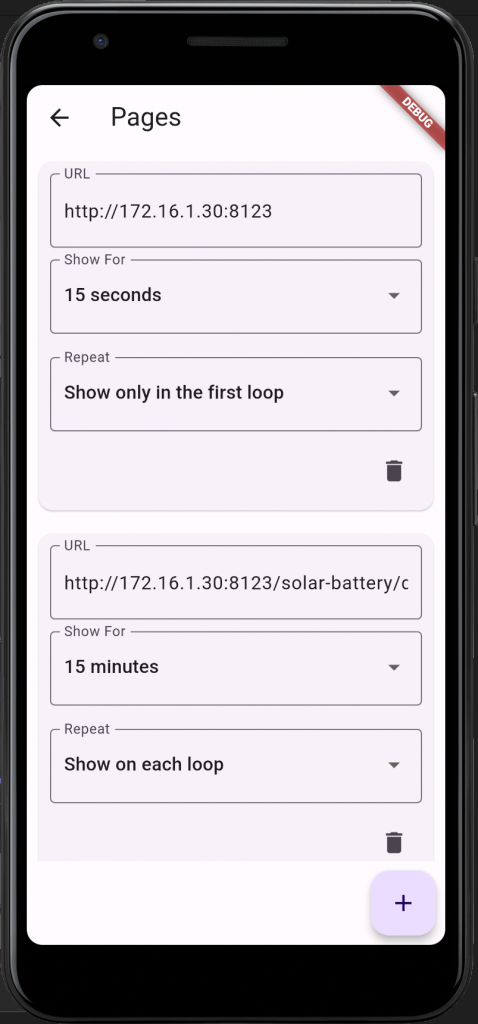
    In the configuration menu you can add additional pages with the plus icon on the bottom right:

    Dashboard Web View configuration

    Each page is displayed for the amount of time in the “Show For” setting, then the next page is displayed, after the last page had been displayed, the display loops back round to the first page that is set to repeat. If you only want a page to show on the first loop, you can set the Repeat to “Show only on the first loop”. This is useful as Home Assistant dashboards with no left hand menu or title can’t be easily exited, so you can show the default page with a title and menu for a short period of time then move to the dashboard(s) you want to show.

    Remember that it’s just a web browser, and so you will need to log in to Home Assistant and configure the user settings as you would any browser for the first time, cookies and settings are maintained just like any other browser.

    Dashboard Web View doesn’t just work with Home Assistant, it can be used to show fullscreen pages on rotation for any site that supports Chrome.

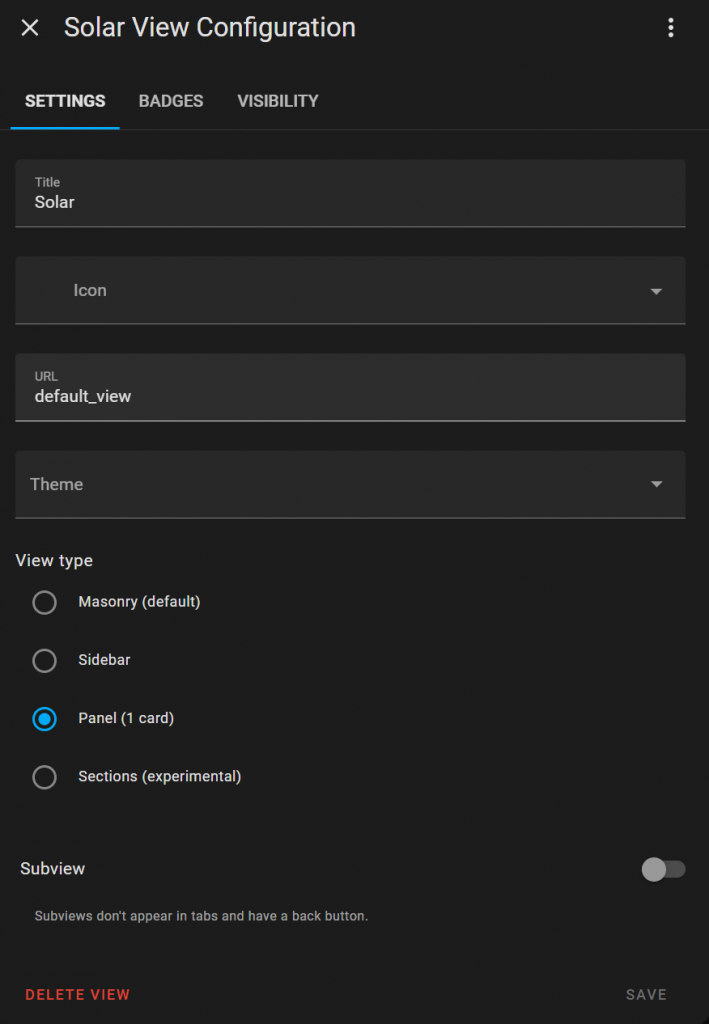
    Using a 1 card panel layout in Home Assistant to improve page rendering

    Enjoy! A final tip on layout of Home Assistant dashboards for a tablet web view. I found the standard “Masonry” layout can render incorrectly on some page refreshes, sometimes it appears with columns missing. If you instead use a “Single Card” layout then use a combination of Horizontal panel and Vertical Panel widgets then the page renders a lot more stable on each refresh.

  • Adding Greener Days sensors to Home Assistant

    Using Intelligent Octopus from Octopus Energy tends to charge your Electic Vehicle at times when it’s “greenest” for the grid, which as well as saving you money is excellent for balancing the usage of energy across high demand appliances like your EV.

    The problem is that currently there’s no real ability for Intelligent Octopus users to tell Octopus to only charge their car if it’s best for the grid on that night. Say you’re only using your EV for running errands for the next few days, you know you need to top up the battery at some point but you’re not fussed if that’s tonight, tomorrow or even the day after. Sure you can tell IO to only put a small amount of charge into your car each night, but if it’s going to be windy tomorrow instead of tonight and that wind power is going spare, then it’s best for cars to hold over a charge to the next day.

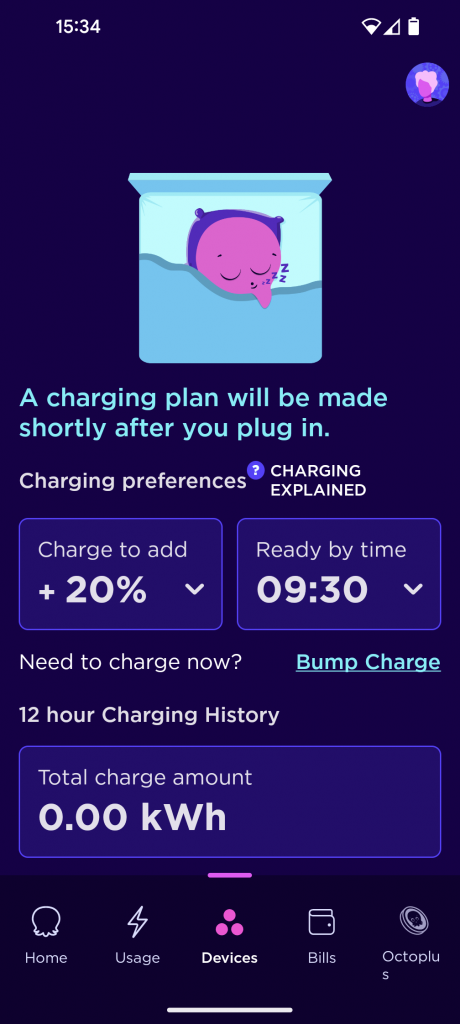
    Octopus app Devices tab
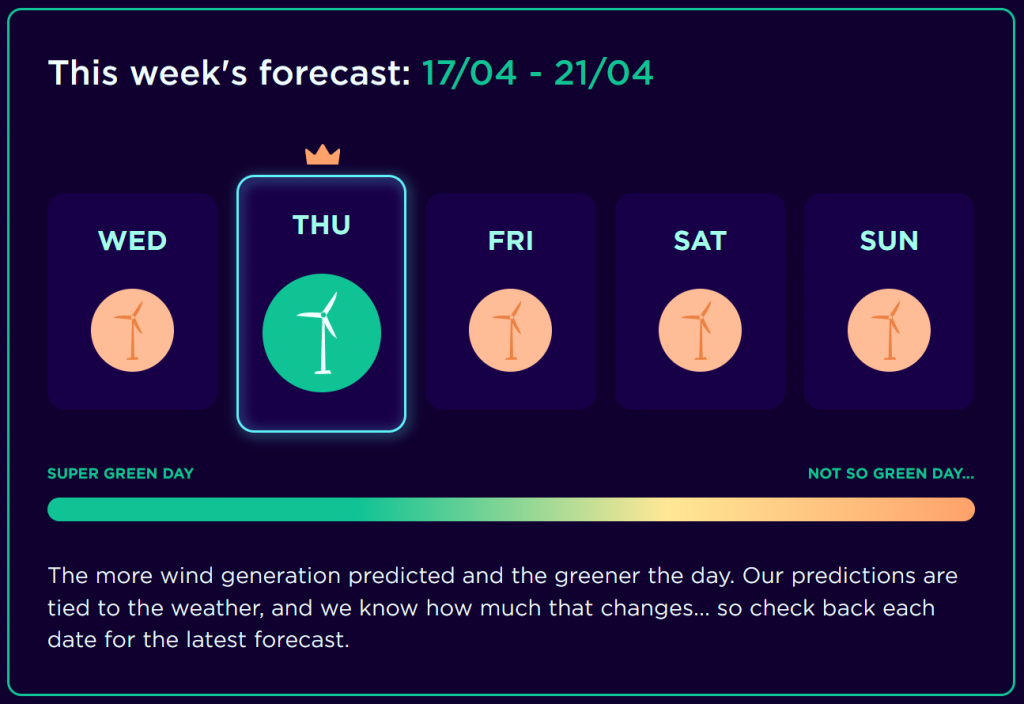
    Enter Greener Days

    Greener Days is an initiative from Octopus which analyses the amount of green energy likely to be available each night and forecasts how “green” the UK grid will be through the night and into the next day.

    Greener Days on the Octopus Energy website

    Each day is ranked by its “greeness index” and appears as a colour, from red meaning bad to green meaning best and days with an excess of green energy are crowned to highlight them as the best days to charge or consume more electricity ( such as charging home batteries ). Using this data to decide which night to charge is not only better for the grid, but also may earn you more Octopoints if you’re subscribed.

    Note, each day refers to that night. This might seem a little strange but is essentially telling you which evening it’s best to plug in to charge overnight. This means that if “Thursday” is highlighted then it’s actually early Friday morning which is going to be the greenest.

    Home Assistant

    Home Assistant has support for sensors based on Greener Days data thanks to the amazing Octopus Energy integration by Dave Kendall. Using these sensors it’s possible to automate certain activities such as setting the charge level of your home batteries to a higher state of charge, or setting the EV to charge to a higher level / at all. The raw sensors are extremely useful as they are.

    The two sensors available are:

    Greenness Forecast Current Index, which provides a value from 0 to 100 based on how “green” the grid is currently.

    Greeness Forecast Highlighted, which is a binary sensor showing that the current period would have been shown on the website as a crown, and is the greenest day to charge ( and may earn you Octopoints ).

    Octopus Energy Greeness Index attributes

    What’s also useful is that the “current index” sensor also contains a bunch of attributes, one of which is the future forecast, and using this data we can present a forecast inside a Home Assistant dashboard:

    Showing Octopus Greeness Index on a dashboard

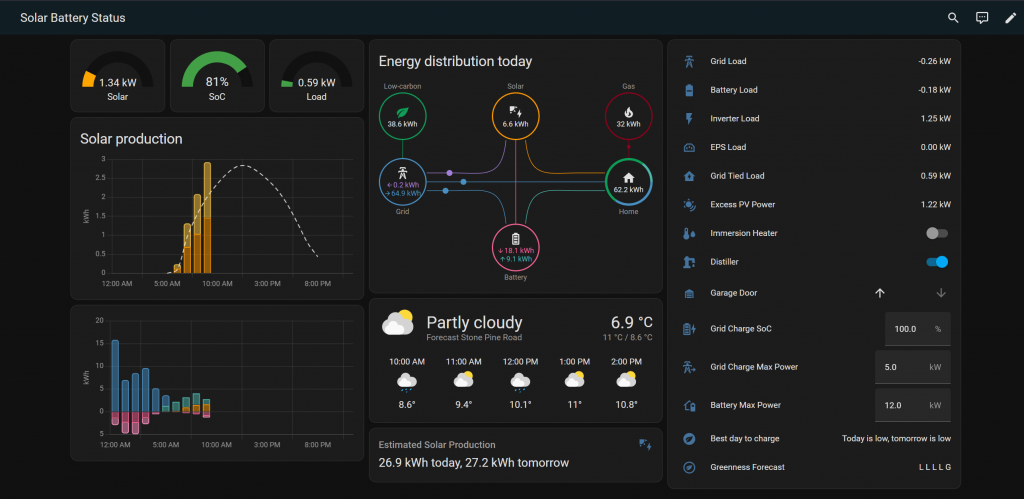
    I’ve built two sensors, one which provides an easy to read analysis of the best day to plug in, which can show if today or tomorrow is going to be greenest, or if not which day in the next three days is going to have the highest greeness index. If it’s not desperate to take on a charge then I can use this sensor to work out the best night to plug in.

    The second sensor provides a forecast of the next 5 days, showing a day by day state of the greeness index, as Low, Medium, High or Greenest shown as L, M, H or G. The first letter is tonight, the next letter is tomorrow, and so on.

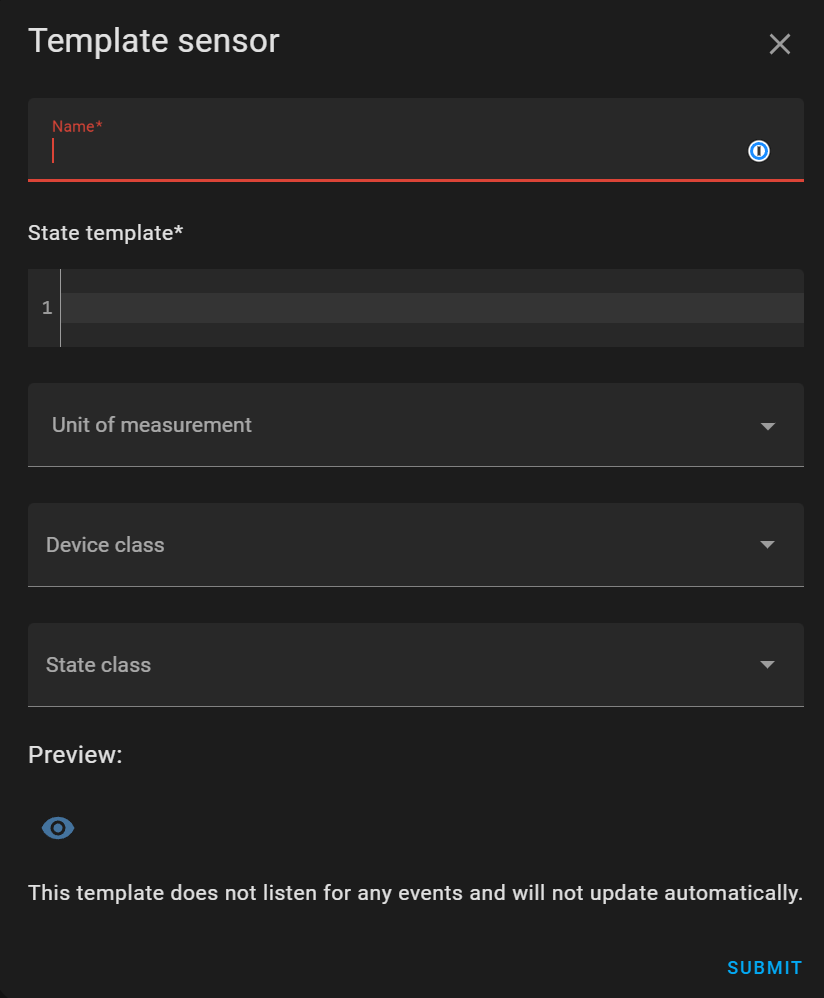
    While there’s more optimal code, I’ve written these so they can work as regular Template Sensors within the UI, so no YAML! To create them, head to Settings > Devices > Helpers and then choose Create Helper from the bottom of the screen then Template then Template a sensor.

    Creating a template sensor

    There you can give the template a name, and in State Template, pase one of the following.

    Important: Each sensor contains your account number, so the code below has my account number replaced with xxxyyy, so it’s best to copy this code into a text editor then replace xxxyyywith your account number.
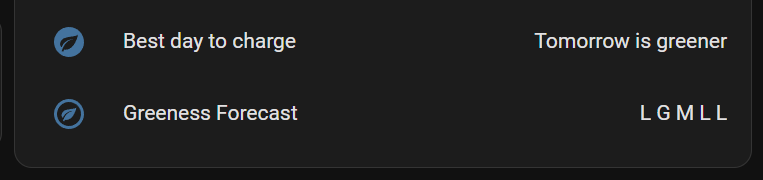
    Best day to charge

    {% if state_attr('sensor.octopus_energy_a_xxxyyy_greenness_forecast_current_index', 'forecast')[0].is_highlighted %}
    Today is greenest
    {% elif state_attr('sensor.octopus_energy_a_xxxyyy_greenness_forecast_current_index', 'forecast')[1].is_highlighted %}
    Tomorrow is greener
    {% elif state_attr('sensor.octopus_energy_a_xxxyyy_greenness_forecast_current_index', 'forecast')[0].greenness_index == 'HIGH' %}
    Today is high
    {% elif state_attr('sensor.octopus_energy_a_xxxyyy_greenness_forecast_current_index', 'forecast')[1].greenness_index == 'HIGH' %}
    Tomorrow is high
    {% elif state_attr('sensor.octopus_energy_a_xxxyyy_greenness_forecast_current_index', 'forecast')[2].greenness_index == 'HIGH' %}
    Day after tomorrow is high
    {% else %}
    {{ "Today is " + state_attr('sensor.octopus_energy_a_xxxyyy_greenness_forecast_current_index', 'forecast')[0].greenness_index.lower() + ", tomorrow is " + state_attr('sensor.octopus_energy_a_xxxyyy_greenness_forecast_current_index', 'forecast')[1].greenness_index.lower() }}
    {% endif %}

    Greeness Forecast

    {% if state_attr('sensor.octopus_energy_a_xxxyyy_greenness_forecast_current_index', 'forecast')[0].is_highlighted %}
    G
    {% else %}
    {{state_attr('sensor.octopus_energy_a_xxxyyy_greenness_forecast_current_index', 'forecast')[0].greenness_index[:1]}}
    {% endif %}
    {{" "}}
    {% if state_attr('sensor.octopus_energy_a_xxxyyy_greenness_forecast_current_index', 'forecast')[1].is_highlighted %}
    G
    {% else %}
    {{state_attr('sensor.octopus_energy_a_xxxyyy_greenness_forecast_current_index', 'forecast')[1].greenness_index[:1]}}
    {% endif %}
    {{" "}}
    {% if state_attr('sensor.octopus_energy_a_xxxyyy_greenness_forecast_current_index', 'forecast')[2].is_highlighted %}
    G
    {% else %}
    {{state_attr('sensor.octopus_energy_a_xxxyyy_greenness_forecast_current_index', 'forecast')[2].greenness_index[:1]}}
    {% endif %}
    {{" "}}
    {% if state_attr('sensor.octopus_energy_a_xxxyyy_greenness_forecast_current_index', 'forecast')[3].is_highlighted %}
    G
    {% else %}
    {{state_attr('sensor.octopus_energy_a_xxxyyy_greenness_forecast_current_index', 'forecast')[3].greenness_index[:1]}}
    {% endif %}
    {{" "}}
    {% if state_attr('sensor.octopus_energy_a_xxxyyy_greenness_forecast_current_index', 'forecast')[4].is_highlighted %}
    G
    {% else %}
    {{state_attr('sensor.octopus_energy_a_xxxyyy_greenness_forecast_current_index', 'forecast')[4].greenness_index[:1]}}
    {% endif %}

    Then, once you can created these sensors you can add them as entities to any dashboard.